Wednesday 2 April 2008

Gradient brushes in Illustrator


They said it can not be done but it can. Evidently you cannot use a gradient in an Illustrator brush.

First create your gradient within a small rectangle and then go 'Object ... Expand' and make sure fill is ticked and Specify say 200 steps. Grand ... and here's the trick, now look for the gradient object in the Layers pallete and see where is says Group, open that and another Group and you wil see a Clipping Path. Delete that Clipping Path.

Now when you drag your gradient rectangle to the Brushes pallete you will get no complaints about objects it can't use. These gradient brushes are obviously very heavy data wise so bear that in mind.

Importing a backup of Mac Mail


Many mac users backup their Mac Mail to disc. Importing it back into Mac Mail to retrieve some mail can be a confusing and frustrating experience. The 'Import Mailboxes' in Mail is looking for a .mbox file within the folder of your backup.

I've a dot.mac mail account and a cable pop3 mail account, backed up onto a dvd. Could I get Mail to import the pop3 account from the disc? Nooooo! It could get the dot mac stuff but the pop3 was all but invisible.

Ok, so Mail wants to be stoopid, I decided to keep it real simple and dragged the pop3 folder onto the desktop ... and then sent Mail to Import Mailboxes and look in that folder on the desktop and wonders of wonders it found it and successfully imported my pop3 mail backup.

Tuesday 25 March 2008

Easy peasy psychedelia


The swirly colour background was created using the gradient tool in Photoshop. I used the Spectrum gradient preset ... and then, and here's the trick, I set the gradient tool mode to Difference, as opposed to the usual Normal mode. When you drag the gradient tool across the image area a few times, a colourful background starts to appear like magic. I then ran the Twirl filter and then in the Zigzag filter the pond ripples a few times. Wow! Instant 60's effect man!

Friday 29 February 2008

Shrink PDFs with ColorSync Utility


Launch ColorSync Utility from your OSX Utilities folder. At the top, hit Filters ... and Reduce File Size ... and then View file with filter and go and look for your pdf file. Mine was 772k file for a small 45mm sticker art!

You can also click Duplicate and work on a copy.

Click the Details button and then ... Images and scale away. 50% got my pdf down to 444k. Yeah, yeah, I know it can be done in Acrobat or whatever and what with broadband and huge drives it is a bit of a pointless exercise but it is amazing what is tucked away in OSX.

Monday 25 February 2008

Dots brush in Illustrator


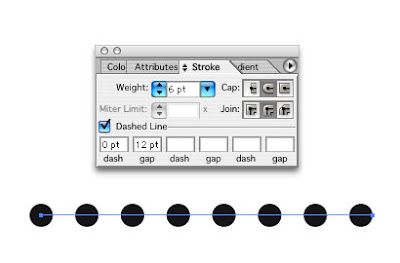
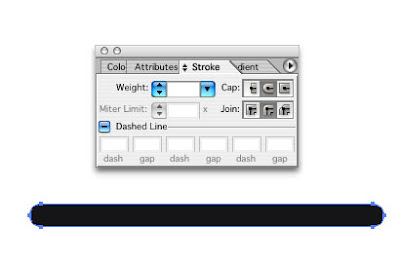
The usual way to create a dotted line in Illustrator is to use the dashed line dialog in the Stroke panel. But just say that dotted rule had Outline Stroke applied to it. Yikes! Dots no more, just a single oval thing now appears. Expand apprearance does something similar, turns the dots into one long rectangle.

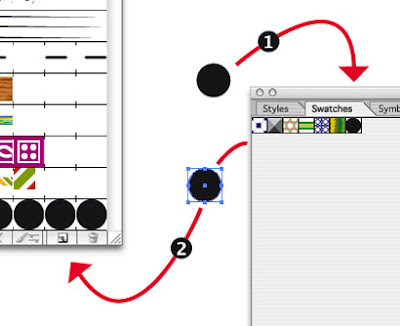
Here's a much more flexible approach to applying dots to rules, ovals and boxes. First create a simple dot shape. Now drag that dot into the Swatches panel, then drag the now swatch of the dot onto the desktop and then onto the New Brush icon on the Brushes panel and hit New Pattern Brush.

In the Pattern Brush Options set it up like so. You want to fill up those five boxes at the top by clicking on one and then clicking New Pattern Swatch. Set the Colorization to Hue Shift, so you can change the colour of your dots later by simply changing the stroke colour. Set the Size as below to begin with but altering them you can change the spacing between your dots later. Also altering the stroke size will increase the size of the dots.

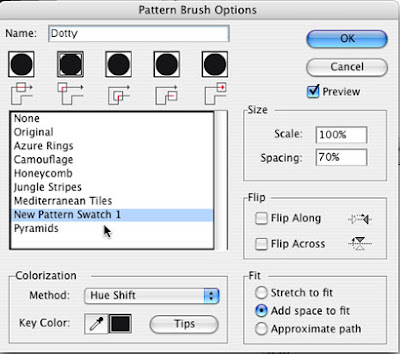
Finally click Add space to fit will automatically adjust the dots applied to ovals, circles and boxes. Make a file with this brush, call it dots or whatever and dump the file into your Illustrator - Presets - Brushes folder, and when you restart Illustrator it will be available in your Window - Brush Libraries pull down dialog.

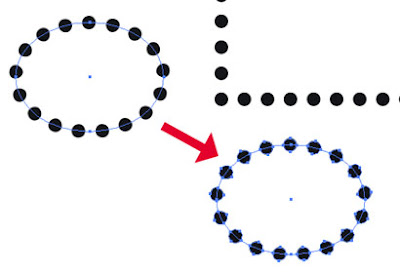
Now when you go Expand Appearance, the dots remain dots.

Monday 18 February 2008

Barbed wire Illustrator brush


Keep it simple. A fairly realistic metallic feel can be created with three colours. The twisted wire I created using the Zig zag filter on a horizontal stroke, and then Reflected a copy. Ta-dah! Twisted wire.

Anticipate how the ends of your short section of wire will look once it starts repeating.

Once you are happy with your art, drag it onto the New Brush icon on the Brushes panel and hit radio button New Pattern Brush. Use the Hue Shift Colorization Method and then you can easily change the overall colour of the brush by changing the stroke colour of the path that you have attached the barbed wire brush to.